I’m excited to join the Spring into Color Blog Tour, hosted by Simply by Ti.
Spring in our household means birthdays to celebrate! I’m going to share today about a birthday gift that I am sewing.
The pattern that I’m sewing from is the Stuffy Ball pattern from Ellie and Mac (aff links). This is quite a fun project because it makes both the parents and children quite happy. The child gets a beanbag to lay on and enjoy while the parents get a cute storage option for the loads and loads of stuffed animals (that tend to multiply around the house).

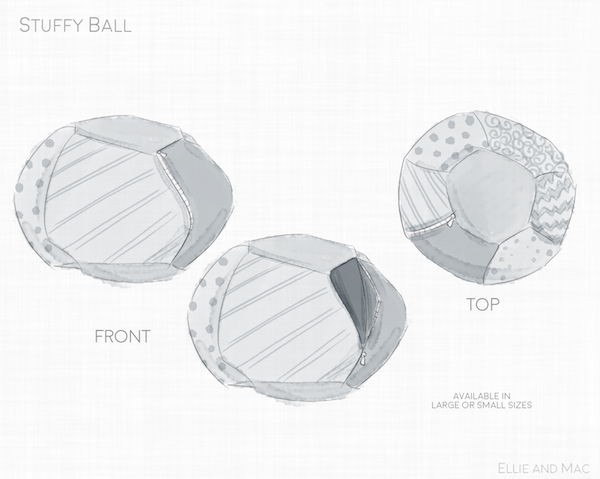
I picked the Small size to sew for this project. I will be making two balls for birthday gifts (but I’ll share about one of the projects in this post). Initially I bought new fabric for this project (intending to color coordinate two fabrics for 3 panels and 3 panels, per ball).

As I started cutting the fabric I found that the fabric requirements listed in the pattern were not for 44″ woven fabric (the pattern will be updated). The updated fabric requirements are the following:
Small stuffy ball: 44″ wide woven fabric, 2 1/8 yards
If you’d like to use two different 44″ wide fabrics, 1 1/8 yards are required of each fabric.
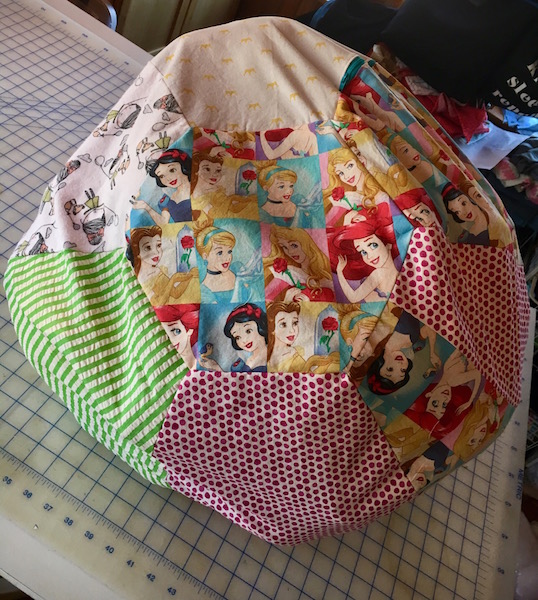
As I didn’t purchase enough fabric for this project, my next thought was to use the new fabrics but also expand to use additional fabrics from my stash. In hindsight, I think this project is a GREAT use for stash fabrics.

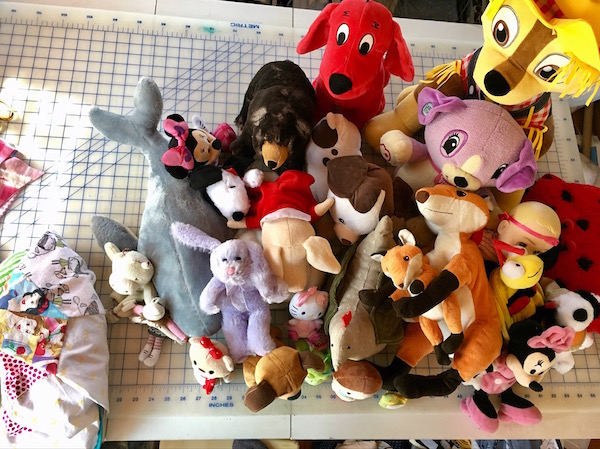
As I looked around the house to gather the stuffed animals (to place inside the ball) I had quite a funny problem.

I placed 27 various sized stuffed animals in the stuffy ball and I still have room for more! I’m so glad I didn’t donate toys after Christmas (as I needed them to fill the stuffy balls). Plus I sewed the smaller size, so keep this in mind if you are sewing this project (I could fit more stuffed animals in the small size that I sewed).
Future plans:
I plan to sew up a second stuffy ball for a second birthday gift. I’m going to change the construction order for the second ball (just for fun). The pattern has you sew the side pieces first to the top and bottom hexagons. Then you sew the side pieces second. I’d like to try on my second stuffy ball to sew the side pieces together first and then sew the hexagon pieces to the sides second. I’ll edit this post to share my thoughts on the construction order after I sew the second project.
I used a 23″ long zipper that the pattern recommends. For the second ball I’d like to try a 25″ long zipper. One of the stuffed animals was quite tall so a slightly longer zipper will help give more room for adding or removing stuffed animals.
Let me know if you’ve made this pattern or if you have any other fun sewing patterns that you’ve made for toy storage solutions.
I highly recommend you check out this pattern! It’s a great storage solution and I’ve also heard of some sewing these up to store/hide their fabric and yarn stashes as well.
(Edited to add a pattern review template for further pattern review details to include):
Pattern Description:The Stuffy Ball Sewing Pattern is a fun way to store your favorite things. They can hold fabric you’d like to secretly stash or organize, throw blankets, or stuffed animal friends. My daughter has a large collection of Beanie Boos and other stuffed animals that seem to take over the room. This pattern is a great solution to give all those cute little stuffed animals a comfy home and then when zipped up, it doubles as fun seating. Dual purpose patterns are always a win in my house! Kids love them, moms love them, sewing enthusiasts will love them and even your furry pets will love their comfort!
Pattern Sizing: small and large, I sewed a small
Did it look like the photo/drawing when you finished sewing? Yes
We’re the instructions complete and easy to follow? Yes. I mentioned in the post that I may change the construction order a bit for the second ball that I sew (and I’ll share back how this goes by editing this post).
Fabric used (did you use the suggested fabrics in the pattern)? I used woven fabrics as suggested in the pattern.
Did you alter the pattern in any way? No
Was there anything you disliked or would change? I would like to use a 25” zipper instead of a 23” zipper (as recommended in the pattern) for my second project.
Would you sew it again? Yes!!
Would you recommend it to others? Yes!
Do you consider the pattern beginner/intermediate/advanced? Advanced beginner due to the zipper closure used in the pattern.
Does the pattern include layers for easy printing? Yes
Seam allowances used in the pattern: 5/8”
Is the pattern cut or no cut pages? No cut pages

Please go and check out the other bloggers on this blog tour:
Thursday, March 1st: Sewing By Ti- Intro
2nd: Tenille’s Thread
Monday, March 5th: Confessions of the Pink Obsessed
6th: Sewn By Lone
7th: Sewing By Ti, Stylin Stacy
8th: EYMM
9th: Stitched by Jennie
10th: Elli and Nels
Sunday, March 11th: Make it Sew with the Bear and Pea Atelier
12th: Very Blissful
13th: My Heart Will Sew On
14th: Sewing Blue
15th: Seams Like Style
16th: Kate Will Knit
17th: Twinado Alley
Sunday March 18th: Mermaids Den
19th: My Sewing Roots
20th: Our Play Palace
21st: Kathys Kwilts and More
22nd: The Fairy Dust Bin
23rd: Oak Blue Designs
24th: Aurora Designs Fabrics
Sunday March 25th: Flaxfield Sewing
26th: Seams Sew Lo
27th: Ma Moose
28th: Back 40 Life
29th: Auschick Sews
30th: Manning the Machine
31st: Mermaids Den

I love this! I want to make for myself… to hide fabric. Maybe maybe the kids some too. LOL!
LikeLiked by 1 person
Yes!! I love the fabric idea, so smart!! I look forward to seeing if you make one too!
LikeLiked by 1 person