
Hello! I’m excited to share a book review of Joyful Mending by Noriko Misumi from Tuttle Publishing. I first browsed this book digitally and then received a physical copy, in exchange for this review.
I loved the digital copy but reviewing the physical copy brought so much more inspiration. The photos are beautiful and the layout is very thoughtful and easy to follow. I’m someone that has been mending for many years but I found the details and approaches included in the book very refreshing and inspiring! If you’re new to mending or an experienced mender, you’ll find the artful details in this book inspiring for your own mending.
In the “Application” section at the end of this blog post, I have linked the individual supplies as I mention them (in case you are new to mending and aren’t familiar with the materials).
Book Review
Table of Contents:

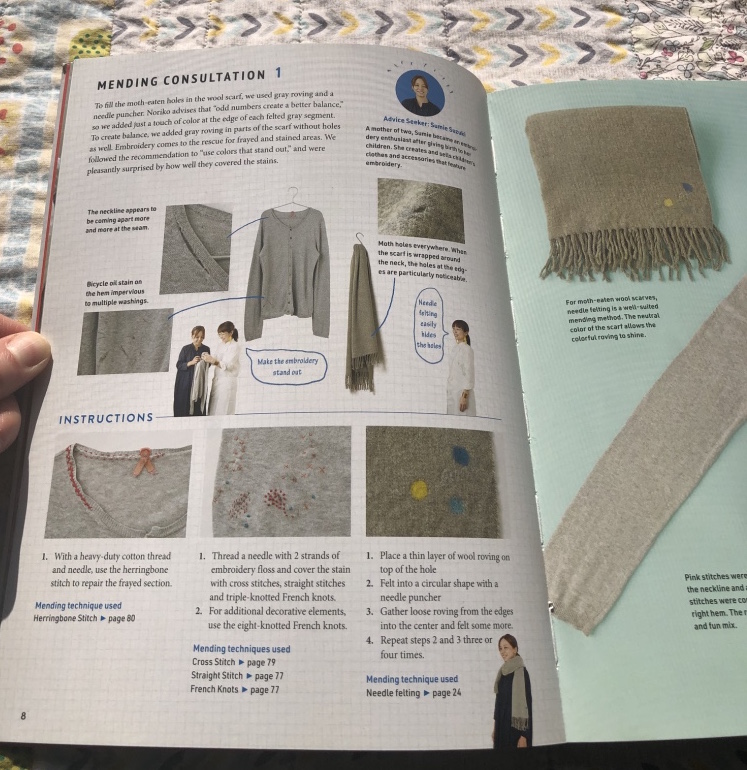
The Mending Consultation Booth includes specific examples of Noriko’s clients with mending repairs.
Noriko is a teacher and consultant. She has shared her experience in the past with sewing techniques through workshops and individual client consultations. Her favorite phrase that she’s heard through her workshops is “I’m so happy I can wear this again!” Breathing new life into a well loved garment (or household object) has been so rewarding for her. This book shares instructions and examples from her specific client examples.
She shares one example of a client with a hole in a wool shawl. For this mend, she suggests to stabilize the hole and then add a botanical crocheted element. This crocheted detail celebrates the original mend into something even better! The book walks through how to recreate each element (including how to make the yellow, crocheted vine).

The following is another example of a client’s repairs that are needed (a sweater and a scarf). The suggested repair approaches are unique and fun.
My favorite detail below shows a lovely yellow crocheted triangle that is added as a visible mend to the edge of a mock turtleneck. I absolutely loved her approach to celebrate mends and make the finished repairs even more beautiful than the original items.

Mending Techniques
In this section, Noriko recommends creating your own mending repair kit to keep all of your supplies together. I have enjoyed doing this as well! It makes the process of mending much quicker when you keep all of your supplies together.

Invisible Mending
I found this section helpful as I had a mend needed in a maxi dress. I referenced the following photo for the mend (mentioned below in the Application section).
I like that both visible and invisible mending are covered in the book. I’m enjoying exploring visible mends for myself and my kids but I find my husband prefers invisible mends for his repairs.

Aprons tend to get a lot of stains and wear over time. I loved the following mending idea to hide a stain on the apron with a sweet little crocheted pocket. She mentioned hiding a treat inside the sweet new crocheted pocked on this baker’s apron.

Patchwork and Rug mending
I love the idea of mending non-garment items as well! Rugs and bags were included in this chapter with fun textural approaches.

Socks and Glove Mending
Whether handmade or commercial socks, this chapter is very relatable. I loved all of the instructions that were included as I especially appreciate mending my hand knit socks. I had a pair of hand knit mittens that I will share about mending in the Applications section.

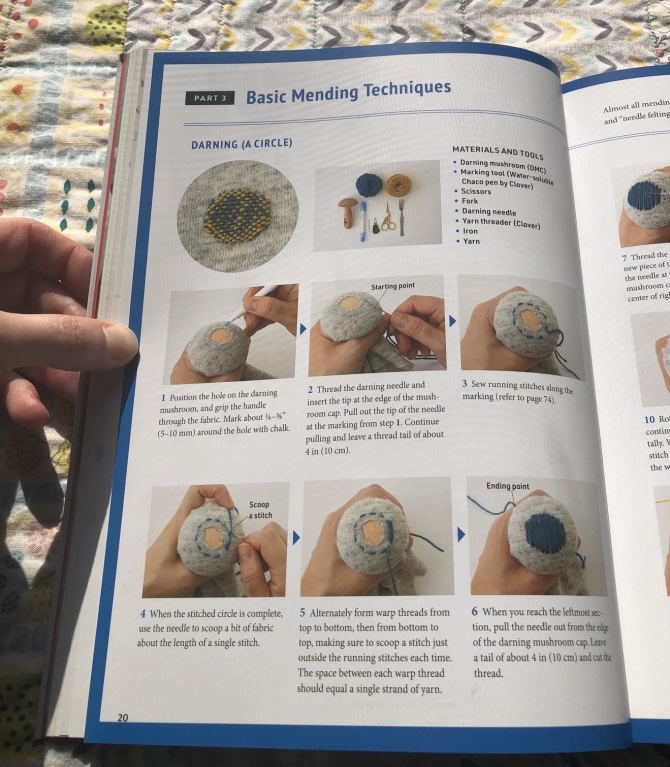
Mending Techniques…Mending with knitting, crochet, and darning
I love that this section specifically walks through step by step instructions for each of the different mending techniques mentioned. There are 7 techniques mentioned in this section, 14 additional mending stitches are included in the Mending Techniques (page 73) and 7 crocheted elements instructions are included as well.
The following is one layered, visible mend that I really liked! I love the idea of layering a circular piece of knit fabric over a hole to create a new beautiful detail to a garment.

I love that this book walks through specific mending applications with a variety of uses and includes detailed instructions. It’s REALLY helpful to read and then apply to your own mending. Every finished photo included in the book includes references to the directions for how to recreate each aspect of the mend.
Application Section
The following are examples of my own mending that I enjoyed working on while reading Joyful Mending.
Mittens
These sweet mittens were so fun to knit. For the knitting pattern I referenced the book, The Knitter’s Handy Book of Patterns by Ann Budd. For the yarn I used Noro Kureyon (which is a beautiful multicolored single, Aran weight wool). I used one end from the inside of the ball and one end from the outside strand of yarn to create stripes with different colors for the mittens (from the same ball of yarn).
Over time, a hole developed in the palm of one of the mittens (shown below).

I had a skein of bright pink Malabrigo Rios wool (worsted weight) in the Fucsia color way. I stabilized the initial hole and then created a balloon with a tail for a fun, visible mended element. I clipped off the end of the yarn (after taking this photo) so that the end of the tail is secure.

I love this mend but I think the next time I would use a much lighter weight yarn for a mend like this (like a fingering weight or lace weight yarn). Although I love the bright color of this yarn, I found the worsted weight makes the finished mend a little more bulky. It works great and is cute but I’d enjoy trying a lighter weight yarn for a future visible mend (to get a more detailed balloon element).
Jeans
I’ve had lots and lots of jean mends in my life. The following photo shows some jeans that haven’t been mended yet. For the next photo, I’m planning to secure the hole in place with whip stitches but leave the hole visible for a nice worn look.

The jeans below have also not been mended but I thought I’d share a photo, just for fun. These jeans had some cute, patched rhinestone elements (that came from the store that way). I thought this new hole that developed leaves room for fun ways to approach this mend.

The following is one of my favorite jean mending approaches. I had a scrap of Scarlet Brick denim from Minerva by Art Gallery Fabrics. I used a larger rectangle and serged the edges to finish the patch. I placed this patch underneath the hole and used DMC cotton thread to secure the hole. I added stitched Sashiko elements to secure the patch in place.

Wool Cardigan and Hat
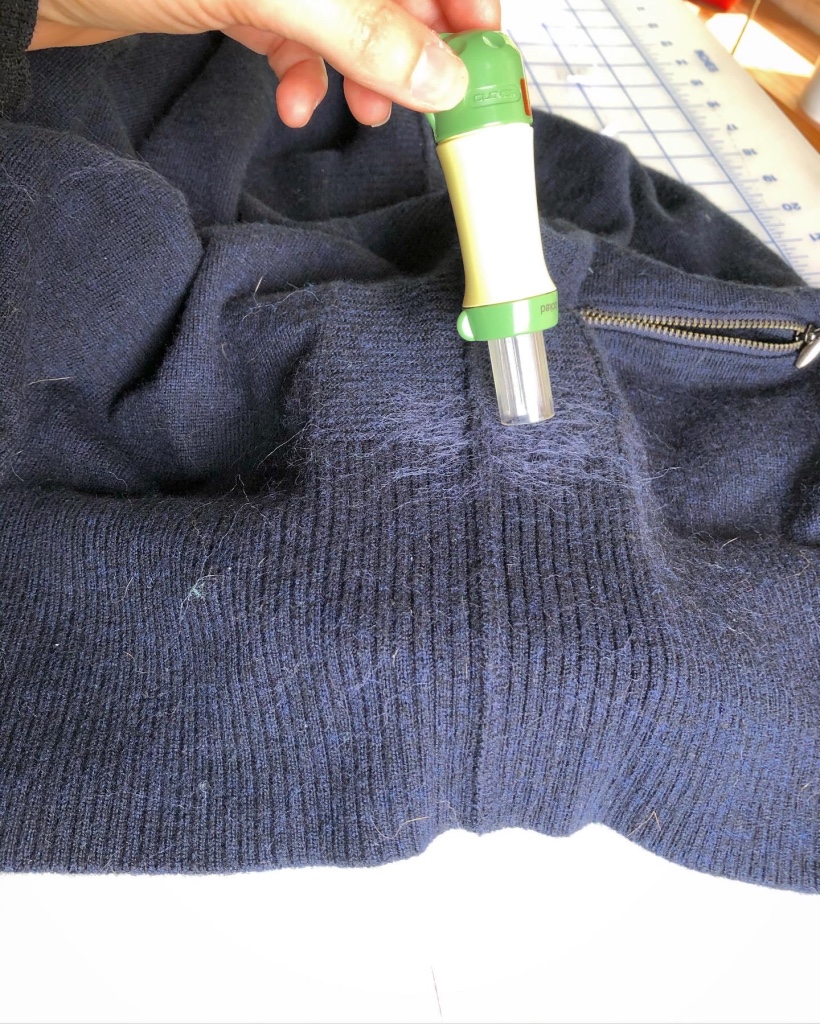
The following are two commercial wool items from Banana Republic (a beanie hat and a cardigan). Both of these items developed holes, over time.

I LOVED the mending approach mentioned in the book to needle felt holes in wool clothing. I hadn’t tried this approach yet and was excited to give it a try for an invisible approach. I used a Clover needle felting mat and Felting needles for this mending (along with matching navy wool roving).

This mend worked really well. I was really happy with the end, invisible mend.
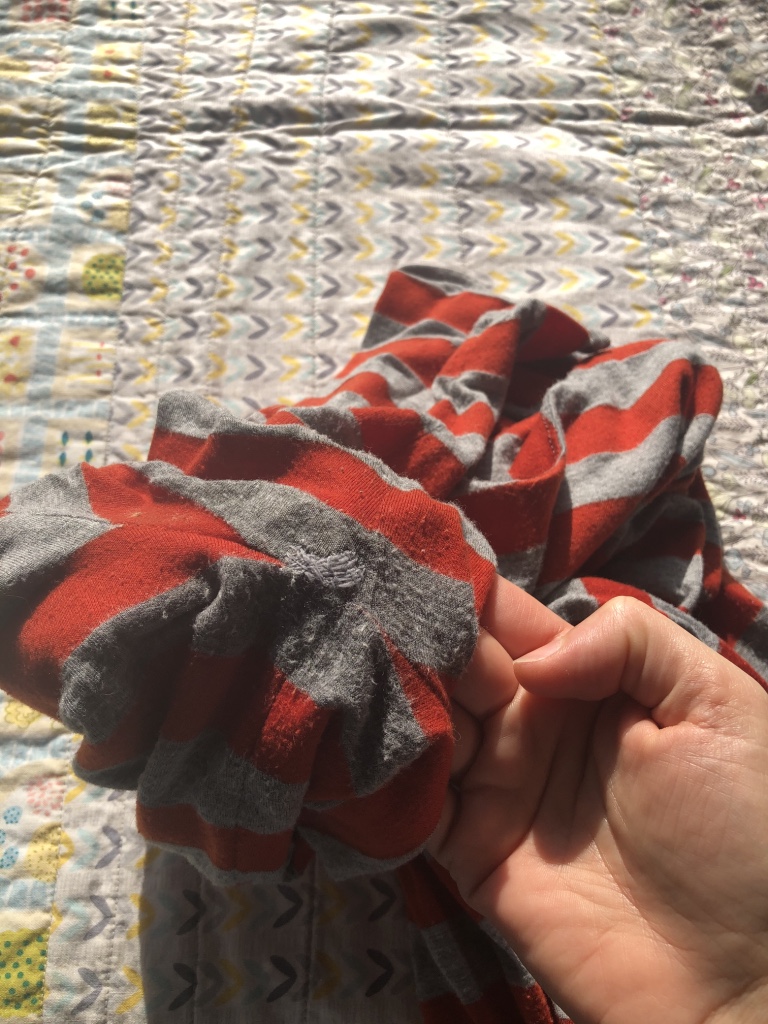
Maxi Dress
For the hole that developed in the underarm of a maxi dress, I used a light grey wooly nylon thread with the woven darning technique (mentioned in the book).
Motorcycle Jacket
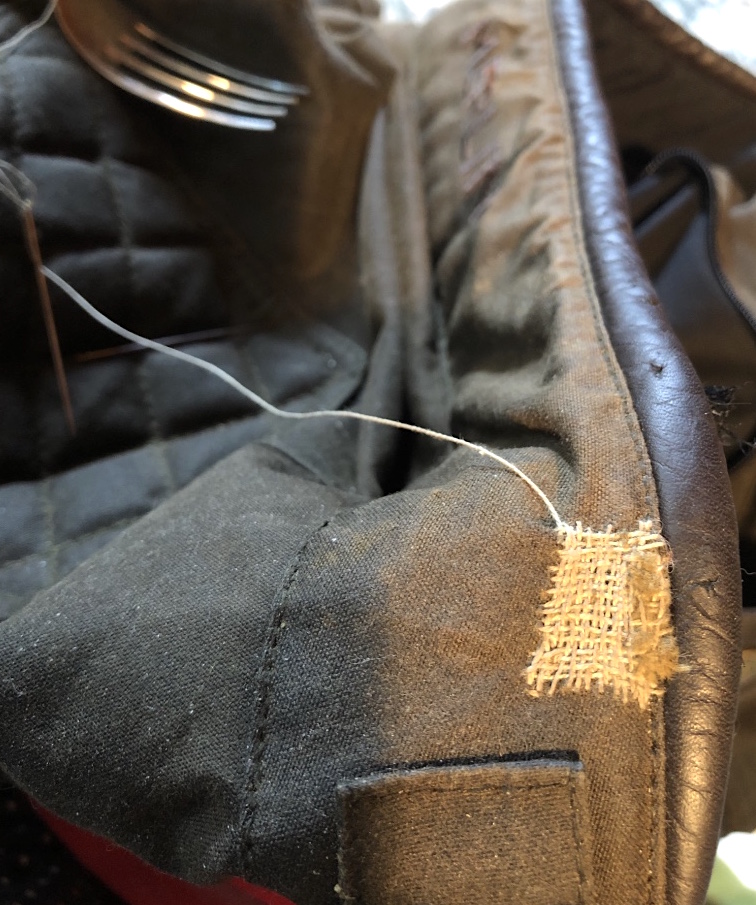
For this project, my husband had recently purchased a beautiful new waxed canvas jacket (in which our dog decided to enjoy as well). This was not a mend that I’ve done before but I felt up to the challenge and loved piecing together inspiration from the book for this mend.

I used some DMC cotton thread along with beeswax and a Merchant & Mills Tailor’s thimble for the first mend. I added beeswax to the embroidery thread before stitching. I decided with the jacket material being a waxed canvas, it would be nice to include wax with the mending thread to match the materials.

I used a square darning technique for the mend. I like to use a fork when doing mends like this to help even out the weave. I used the fork, every other row to even out the tension as I went.
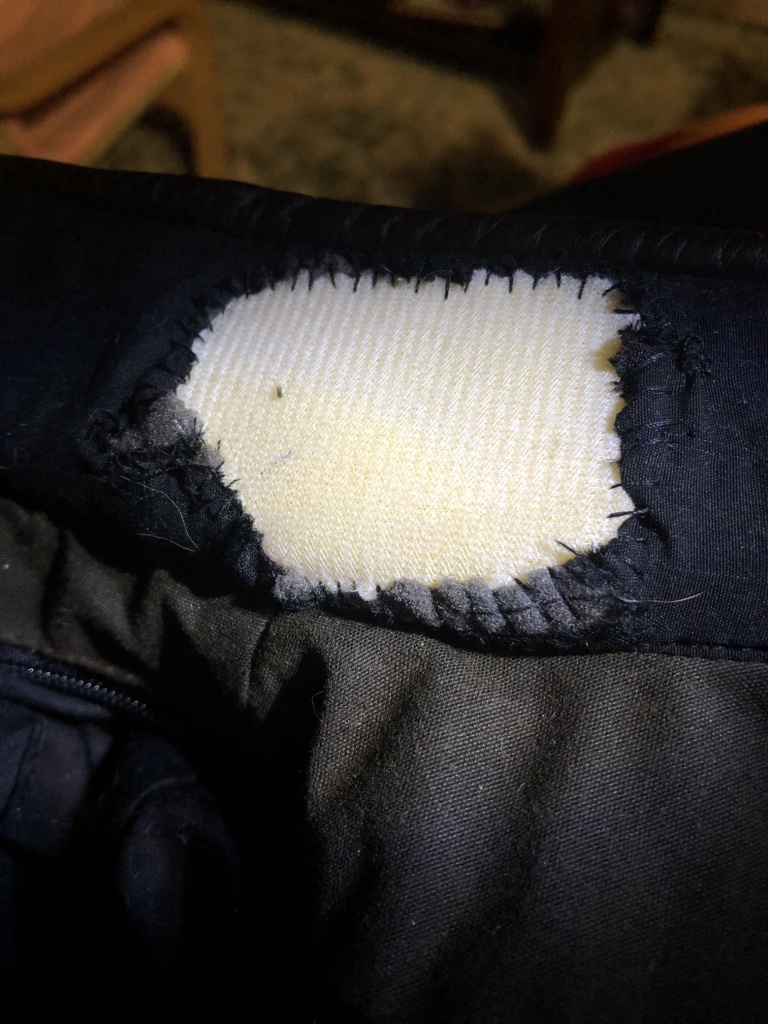
For the next jacket mend, foam had been removed in the collar (by our dog). I used Annie’s Foam Stabilizer to fill the gap and a square of rayon fabric to patch outside of the hole (the outer rayon patch isn’t pictured).


Are you new to mending or having you been mending for a long time?
Thank you for reading! I hope you’ve found this post helpful to browse through the book.
I highly recommend you check out Joyful Mending for lots of mending ideas and inspiration!
